Inline editors
The steps below explain how to embed several ONLYOFFICE Docs editors on the same .html page.
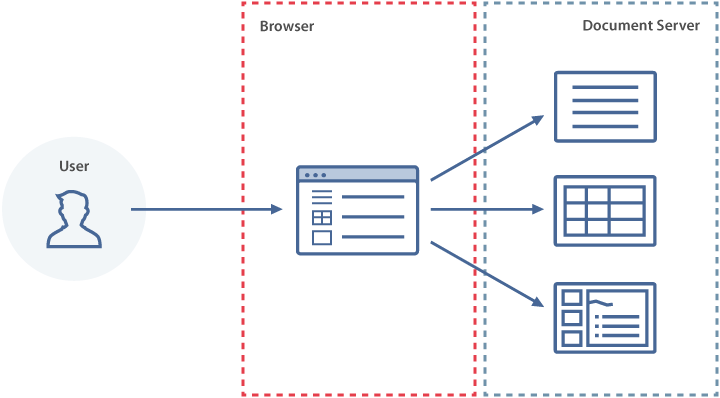
Simultaneous work with several editors is available starting from version 5.5.
-
Create an empty
.htmlfile. -
Add the
<div>elements as shown below. Each editor is attached to its own placeholder:<div id="placeholder1"></div><div id="placeholder2"></div><div id="placeholder3"></div> -
Include the ONLYOFFICE Docs JavaScript API script on your page:
<script type="text/javascript" src="https://documentserver/web-apps/apps/api/documents/api.js"></script>Where
documentserveris the name of the server where ONLYOFFICE Docs is installed. Theapi.jsscript is served by the document editing service; it loads the document editor and connects it to that same service.tipDon't have a document server yet? Register for a free ONLYOFFICE Docs Cloud and use the public IP address or public DNS name of your instance as
documentserver. You can find them in the Instances section of the cloud console. -
Add the script that initializes each document editor for the corresponding
<div>element, using the configuration for the document you want to open:const docConfig = {document: {fileType: "docx",key: "Khirz6zTPdfd7",title: "Example Document Title.docx",url: "https://example.com/url-to-example-document.docx",},documentType: "word",token: "eyJhbGciOiJIUzI1NiIsInR5cCI6IkpXVCJ9.eyJkb2N1bWVudCI6eyJmaWxlVHlwZSI6ImRvY3giLCJrZXkiOiJLaGlyejZ6VFBkZmQ3IiwidGl0bGUiOiJFeGFtcGxlIERvY3VtZW50IFRpdGxlLmRvY3giLCJ1cmwiOiJodHRwczovL2V4YW1wbGUuY29tL3VybC10by1leGFtcGxlLWRvY3VtZW50LmRvY3gifSwiZG9jdW1lbnRUeXBlIjoid29yZCJ9.7IpEJxdOvBQ0kJ8l6ZegIV4tX5vsPbZZCDDVmcFROXc",};const documentEditor = new DocsAPI.DocEditor("placeholder1", docConfig);const sheetConfig = {document: {fileType: "xlsx",key: "af86C7e71Ca8",title: "Example Spreadsheet Title.xlsx",url: "https://example.com/url-to-example-spreadsheet.xlsx",},documentType: "cell",token: "eyJhbGciOiJIUzI1NiIsInR5cCI6IkpXVCJ9.eyJkb2N1bWVudCI6eyJmaWxlVHlwZSI6Inhsc3giLCJrZXkiOiJhZjg2QzdlNzFDYTgiLCJ0aXRsZSI6IkV4YW1wbGUgU3ByZWFkc2hlZXQgVGl0bGUueGxzeCIsInVybCI6Imh0dHBzOi8vZXhhbXBsZS5jb20vdXJsLXRvLWV4YW1wbGUtc3ByZWFkc2hlZXQueGxzeCJ9LCJkb2N1bWVudFR5cGUiOiJjZWxsIn0.8CklPIjYSEkgM7swGAC7-85ICcq_42be3WTWNOuvhlg",};const spreadsheetEditor = new DocsAPI.DocEditor("placeholder2", sheetConfig);const slideConfig = {document: {fileType: "pptx",key: "bv48M5r64Sf9",title: "Example Presentation Title.pptx",url: "https://example.com/url-to-example-presentation.pptx",},documentType: "slide",token: "eyJhbGciOiJIUzI1NiIsInR5cCI6IkpXVCJ9.eyJkb2N1bWVudCI6eyJmaWxlVHlwZSI6InBwdHgiLCJrZXkiOiJidjQ4TTVyNjRTZjkiLCJ0aXRsZSI6IkV4YW1wbGUgUHJlc2VudGF0aW9uIFRpdGxlLnBwdHgiLCJ1cmwiOiJodHRwczovL2V4YW1wbGUuY29tL3VybC10by1leGFtcGxlLXByZXNlbnRhdGlvbi5wcHR4In0sImRvY3VtZW50VHlwZSI6InNsaWRlIn0.FKaDWfJE-OuODhtpq-8Qv6BdDy_evgdpaBw616T7zOs",};const presentationEditor = new DocsAPI.DocEditor("placeholder3", slideConfig);Replace
example.comwith the host serving your document files — i.e., your document storage service.cautionWhen JWT validation is enabled on your document server (the default configuration), each
configmust be signed with a matchingtoken. The tokens above match these exact configs but are signed with a throwaway secret — they will not validate on your server, and they must be regenerated whenever a config changes. Sign with your document server's JWT secret. -
To finish editing, call the destroyEditor method to close the required editor:
documentEditor.destroyEditor();spreadsheetEditor.destroyEditor();presentationEditor.destroyEditor(); -
Open your
.htmlfile in the browser.