Creating plugin template
Before starting plugin development, create a plugin template and configure its settings, which will be displayed in the DocSpace plugin settings.
-
Install the @onlyoffice/docspace-plugin-sdk npm package globally:
npm i -g @onlyoffice/docspace-plugin-sdkNow, the npx command is available, which will be used to create a plugin.
-
To create a plugin template, run the following command:
npx create-docspace-plugin -
Configure the plugin in the terminal specifying the following settings in the dialog:
Parameter Description Name A folder with this name will be created for deploying the plugin. This field is required. The name may only include lower case letters, - and _. Version The current plugin version that will be displayed in the DocSpace plugin settings. Author The plugin author that will be displayed in the DocSpace plugin settings. Name of the logo image The name of the plugin logo image that must be uploaded to the assets folder. There is no need to specify the path to this file. The logo will be displayed in the list of plugins on the DocSpace Plugins tab. The required icon size is 48x48 px. Otherwise, it will be compressed to this size. Description The plugin description that will be displayed in the DocSpace plugin settings. License The plugin license. Homepage The plugin homepage. For example, it can be the plugin GitHub repository. This information will be displayed in the DocSpace plugin settings. 备注Plugins are cached based on their version number. If you upload a plugin with the same version as before, DocSpace will show a warning and skip the update. Increment the version in package.json before each re-upload to make sure your changes are applied.
-
Select the plugin scopes from the list: use the arrow keys to move through the list, press Space to select the necessary scopes, a to toggle all, i to invert the selection, and Enter to proceed:
- API - the plugin will be provided with the origin, proxy and prefix to make requests to the portal server.
- Settings - the plugin will be able to manage settings for the administrator or owner.
- Context menu - the plugin can be embedded in the context menu of files, folders, rooms, images, video (audio).
- Info panel - the plugin can be embedded as a separate tab in the file info panel.
- Main button - the plugin can be embedded in the main button.
- Profile menu - the plugin can be embedded in the profile menu.
- Event listener - the plugin will be given access to the portal events.
- File action - the plugin will be able to interact with the file list, change the file type and image.
- Post message - the plugin will be given access to handle postMessage events from embedded iframes.
- Article button - the plugin can be embedded as a button in the article sidebar.
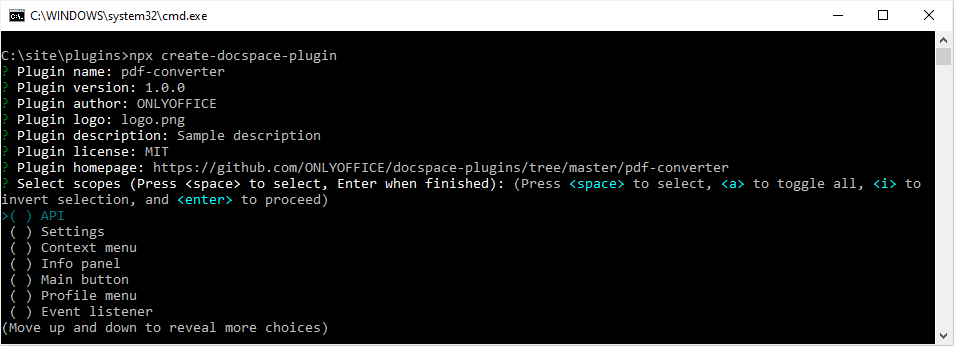
All the specified parameters can be changed later in the package.json file.
In the package.json file, you can also specify the addresses of the third-party websites to add them to the CSP header and prevent these addresses from being blocked.
You can create a plugin in any project by adding the @onlyoffice/docspace-plugin-sdk npm package as a dependency and specifying all the necessary fields in the package.json file.
Migration
For plugins created with the old template (SDK 1.1.1), replace the build script in package.json with the following:
"build": "webpack && npx build-docspace-plugin"
Example
{
  "name": "pdf-converter",
  "version": "1.0.0",
  "author": "ONLYOFFICE",
  "scopes": [
    "API",
    "Settings",
    "ContextMenu"
  ],
  "description": "Sample description",
  "pluginName": "PDFConverter",
  "license": "MIT",
  "logo": "logo.png",
  "homepage": "https://github.com/ONLYOFFICE/docspace-plugins/tree/master/pdf-converter",
  "cspDomains": [
    "https://embed.diagrams.net/",
    "https://*.diagrams.net/"
  ]
}